Lead nurturing playbook
Turning connections into clients for agencies

Turning connections into clients for agencies


Agency Darlings x Copper CRM are teaming up to change the way creative agencies approach business development.
Agency founders are exceptional at their expertise, but struggle with lead generation… and more importantly, lead nurturing (and lead conversion). You’ve probably started to build your agency on referrals but eventually, you’ll outgrow those referrals or use them up.
This playbook is our solution! It’s a strategic approach that turns relationship-building from an overwhelming task into a natural, repeatable process. By combining Agency Darlings' deep expertise in business development with Copper's powerful CRM capabilities, we've created this playbook to help you feel empowered and in control.
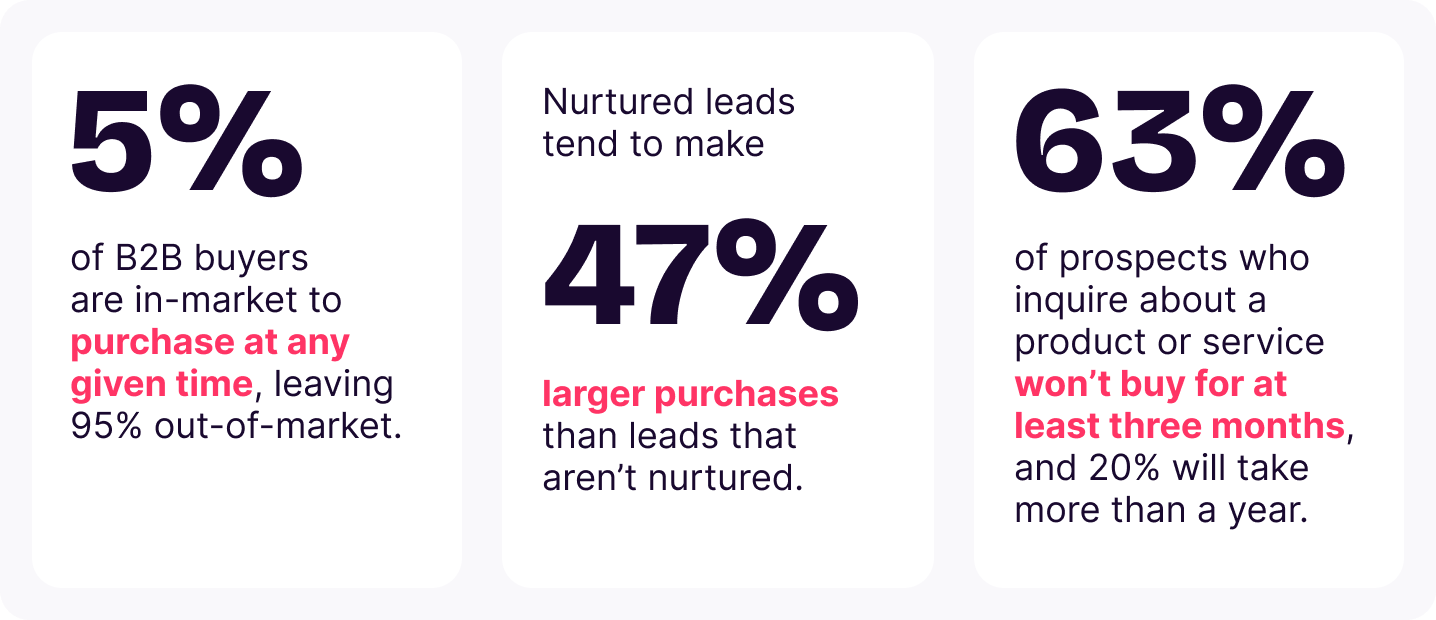
Building a strong brand and staying visible isn’t just a nice-to-have—it’s the backbone of effective lead nurturing and lead generation. It’s truly the key to being the first choice when buyers are ready to make a move. By keeping your brand in front of your audience, you ensure that when the majority shifts into buying mode, your name is the one they remember.
At the end of the day, sustainable agency growth is about patience, consistency, and strategic relationship building.
These stats show us that:
By implementing our playbook, you can turn what seems like a daunting process into one that’s enjoyable, meaningful, and even fun!

One of the biggest challenges with lead generation or lead nurturing? Knowing where to start. And, yes, social media is a powerful networking tool. But, honestly, endlessly scrolling through Linkedin for names isn’t just tedious, it’s downright uninspiring.
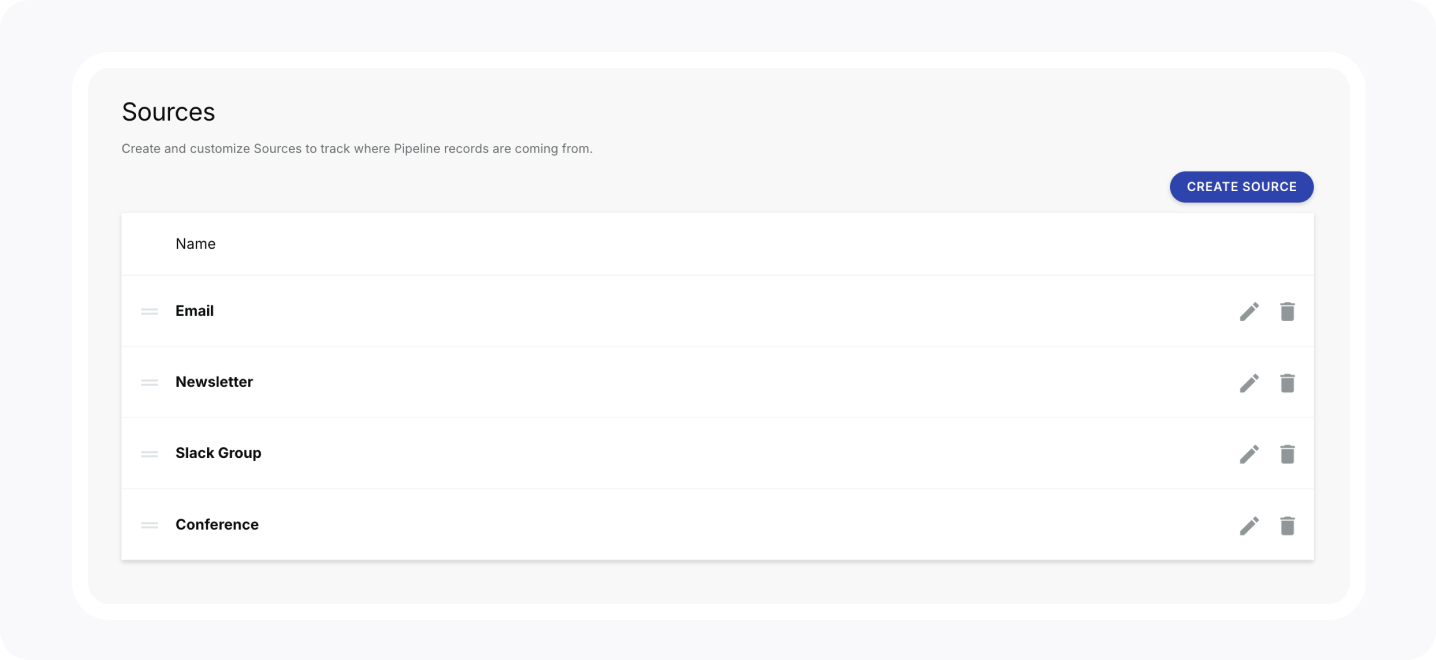
In Copper, you’ll want to set up a custom field for “Prospecting Source” and include all the sources you’re currently sourcing leads from (quality over quantity people!). Down the line, you’ll be able to report on the lead sources that led to your best clients.
For example:
To set this up:
Go to Settings > Customize > Sources > Create Source

The difference between agencies that consistently land new clients and those that struggle isn't just about how many connections they make—it's about how effectively they turn those connections into conversations.
DON'T:
The next hurdle is, you’re having all these great conversations, making solid connections — but the follow-through is slipping through the cracks. Leads that seemed promising started to fizzle out, not because they weren’t a good fit, but because there wasn’t a clear lead nurturing system in place to keep the momentum going.
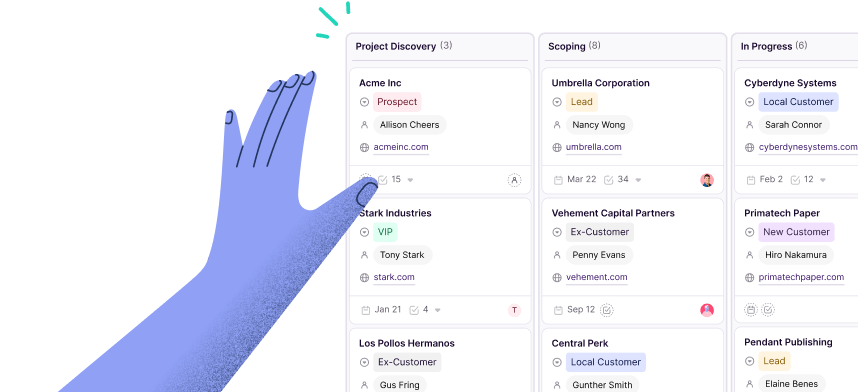
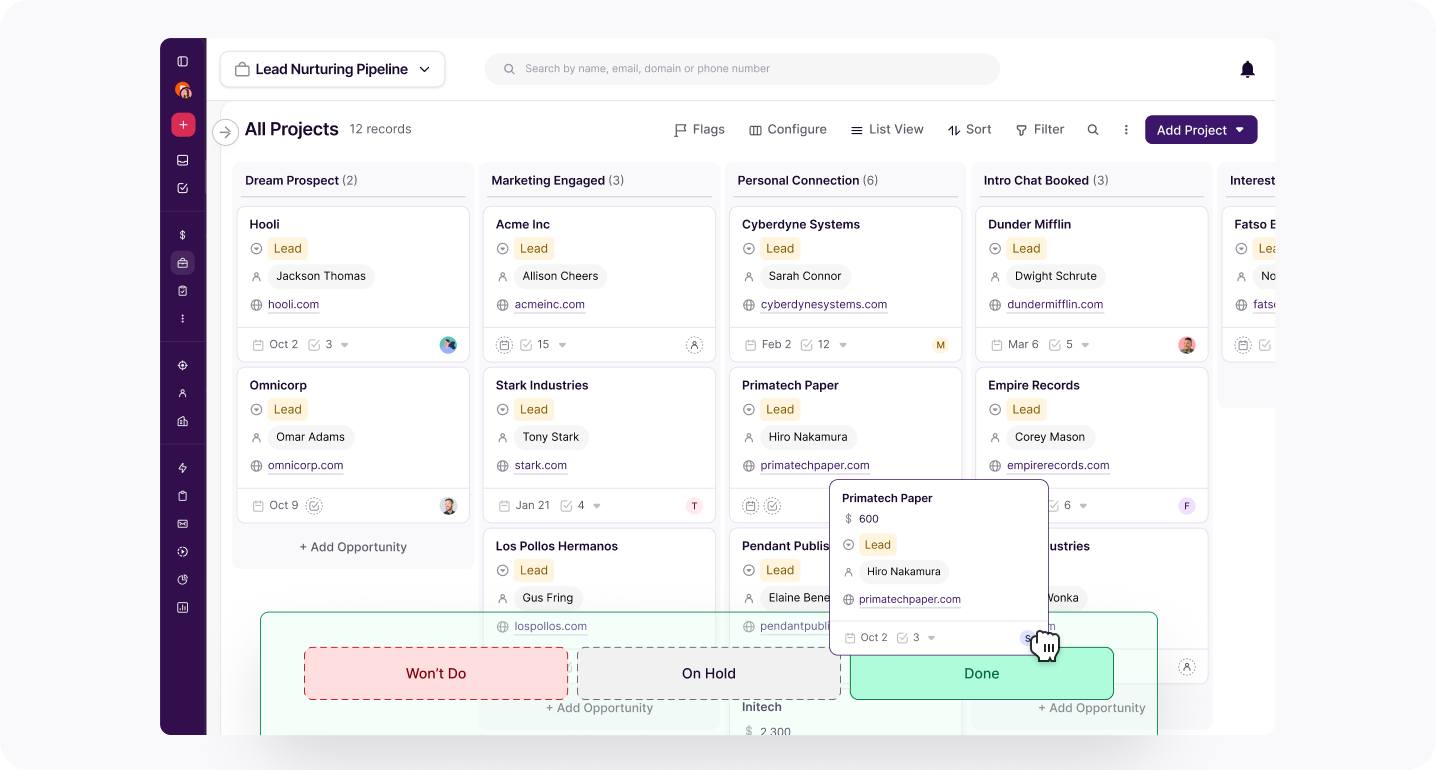
Enter: the Agency Lead Generation Pipeline template in Copper. By setting up a separate lead nurture Pipeline away from your actual deals, it will be easier to track progress and stay engaged. Now, you can easily convert leads into your opportunities pipeline with the click of a button.
The Agency Lead Generation template has the following key stages:
1. Dream Prospect
2. Marketing Engaged
3. Personal Connection
4. Intro Chat Booked
5. Interested Lead
6. Next Quarter Nurture
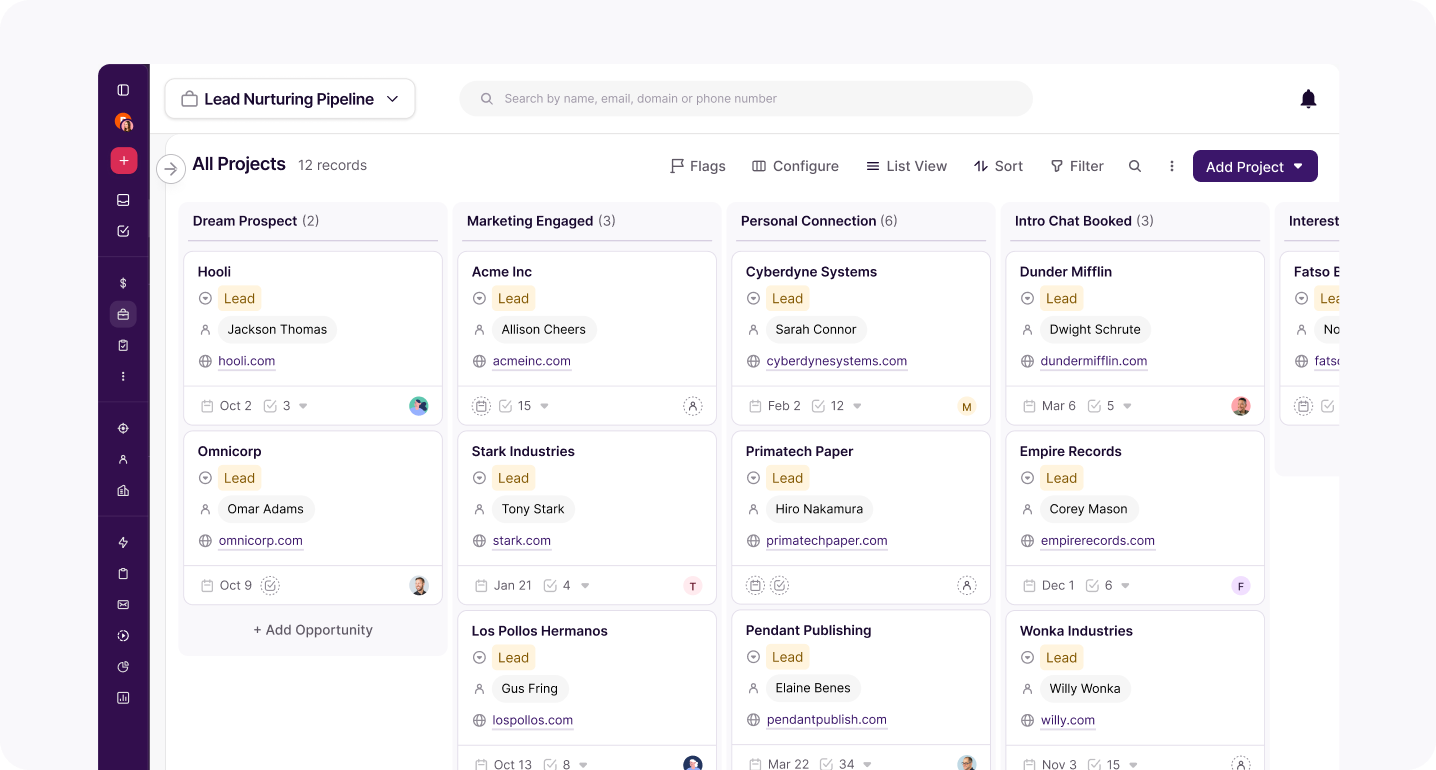
To set this up, hover over "Pipelines" in the left hand navigation > click the "+" > then click the “Agency Lead Generation” template. You'll need to be an Account Owner or Admin on Copper to create a new Pipeline.
Pro Tip: Automate your emails for extra efficiency.
Remembering to follow up with leads as they move through your pipeline can be overwhelming. Instead, your pipeline can keep things moving for you with email automations. When you move a lead into the “Next Quarter Nurture” stage, you can have the lead signed-up for a series of 5 to 7 emails that get sent every few weeks to keep you top-of-mind.
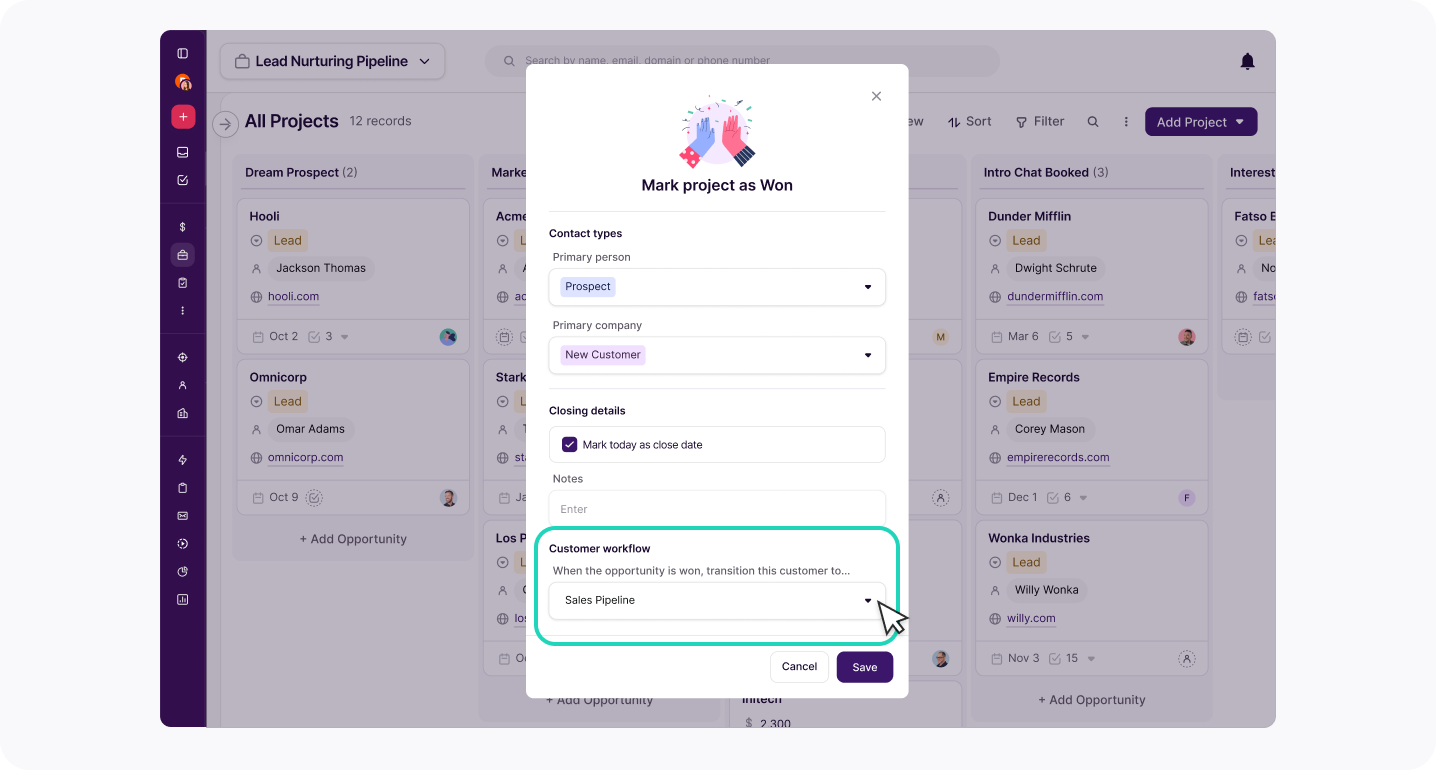
If a lead converts into an opportunity, pick up the contact card and drag it to the bottom, into “Done”.
Then a window will pop up, scroll down to “Customer workflow” and select your “sales pipeline” and you can now take that lead through your opportunities pipeline.
Not every prospect is worth your time. Some are a perfect match, while others… not so much. They key? Organizing and prioritizing your best fit leads so you can focus on the right ones!
Start by adding custom fields on records that help you filter / strategize. For example:
Next, add Tags which allow you to see how many things you have in common with a prospect. The more you have in common, the more you increase your chance for a response:

Of course, if you want to get even more technical, one of our favorite lead generation tips is building your own Client Fit Score directly in Copper!
As its name suggests, a Client Fit Score is like a built-in ranking system that helps you quickly see which leads are worth your time. Instead of sifting through every prospect manually, the score pulls together key factors — like budget, industry, and engagement level—to give you a clear snapshot of who’s the best fit for your business. It’s your shortcut to smarter decision-making, helping you focus on what leads are more likely to convert while filtering out the ones that aren’t the right match. This way you can really hone in on the ones that actually move the needle!
2. Values alignment
3. Size
4. Revenue
5. Signs of growth
When you add up your ranking of each individual attribute you get an overall Client Fit Score.
Of course, you can tailor your Client Fit Score to your own business to help you identify who the best fit is for you. But use this template to get you started.
To set up a Client Fit Score in Copper:
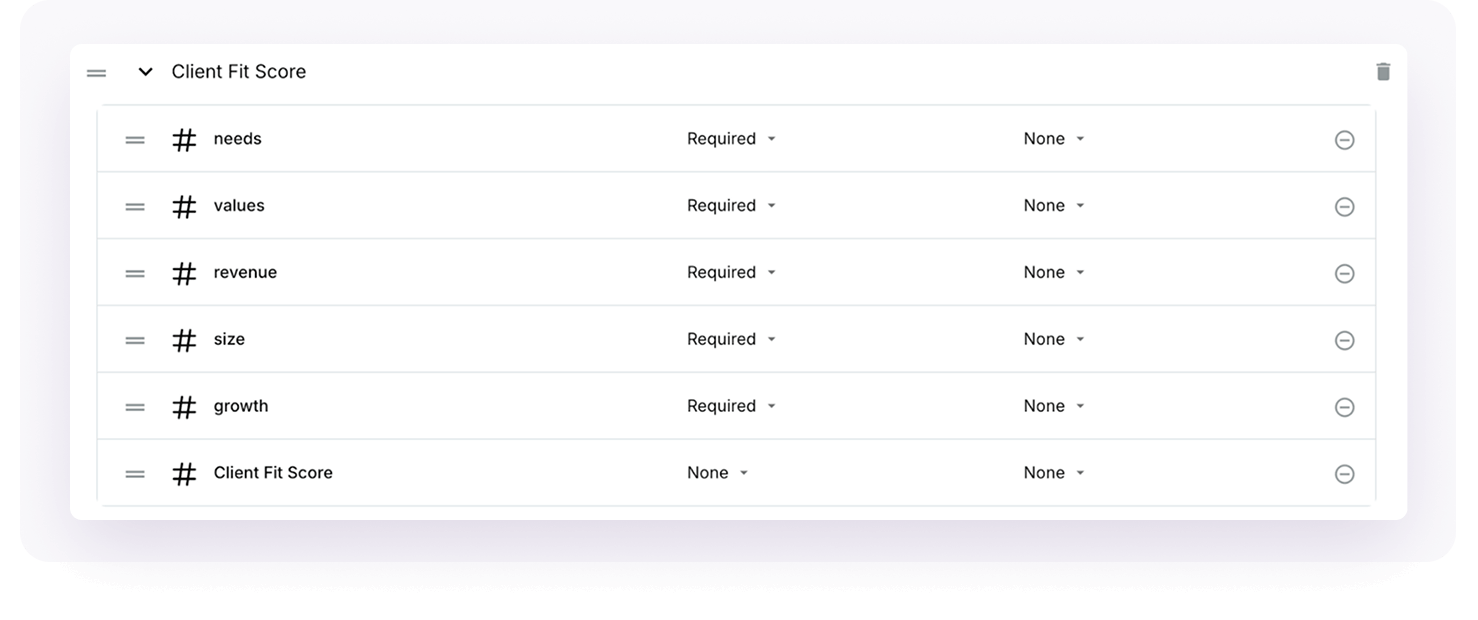
Go to Settings > Customize > “Manage Fields on Records”Select “Add Section” and name it “Client Fit Score”Now you’re going to “Create Field” for each of our attributes and add them to the Client Fit Score section:
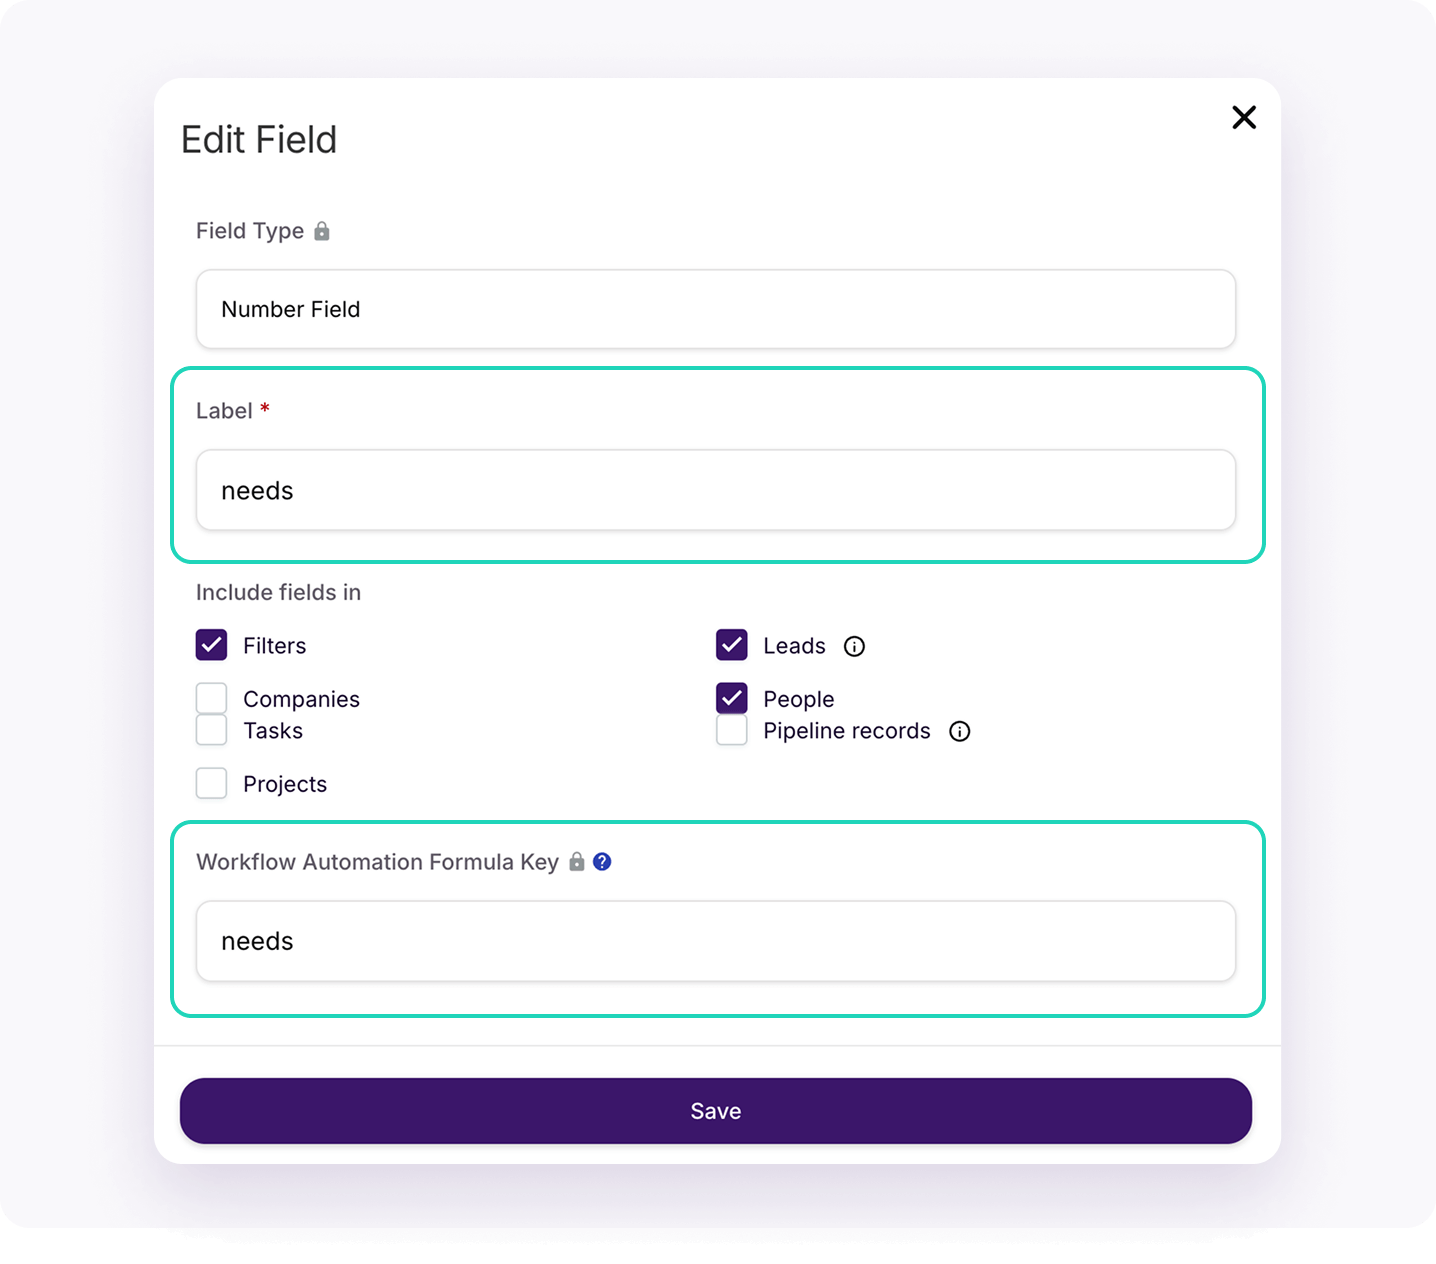
Repeat this for each attribute and drag them all into your section labeled “Client Fit Score”, using the two gray lines on the left. Select “Required” for record creation rules and apply to all fields.
Note: Your Client Fit Score placement determines where it appears on your lead contact card — so if you want it front and center, just head back to this page and drag it to the top.
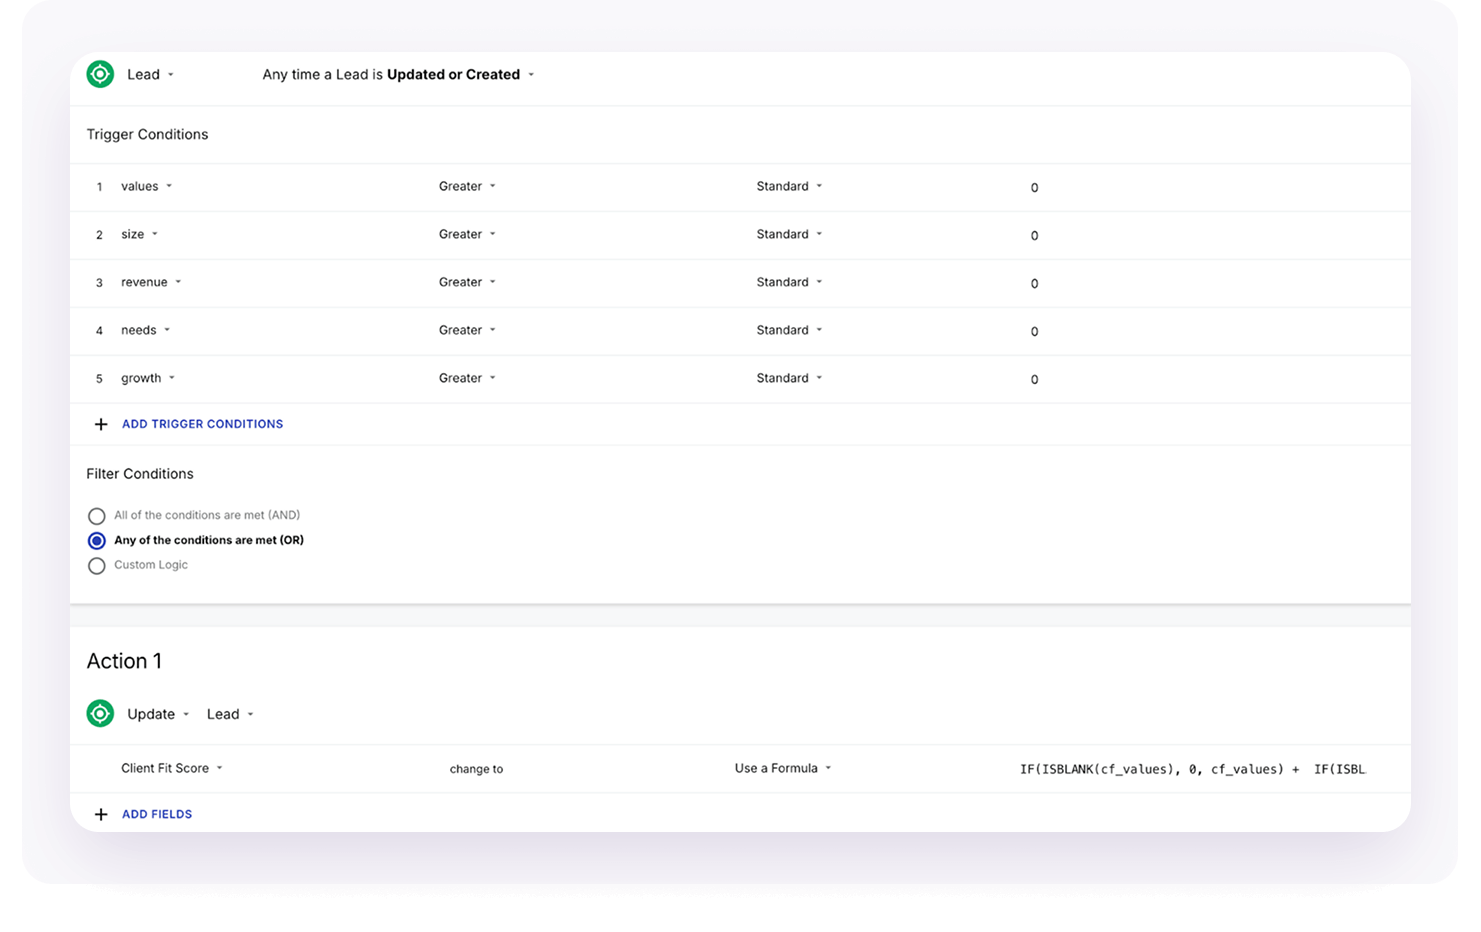
Now, create a field called Client Fit Score” that sums up all the individual scores into one total. The settings are all the same for this and your workflow automation key will be “Client Fit Score”.
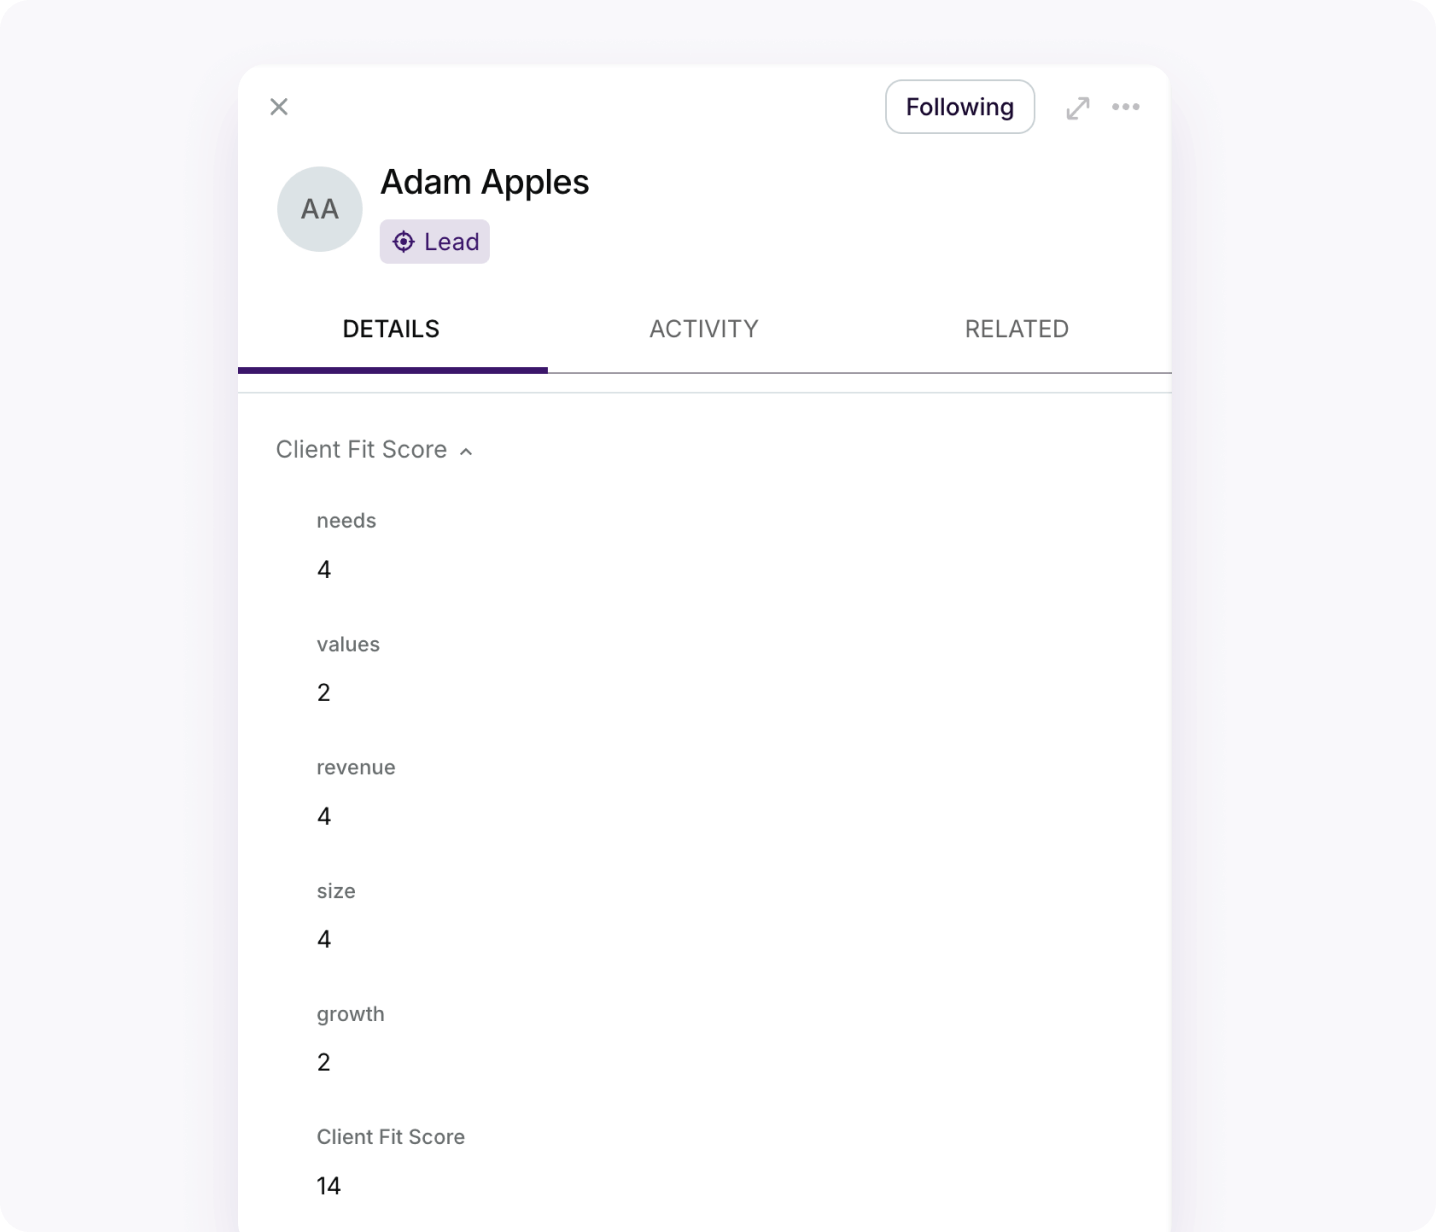
When completed, it should look like this:

Great! Your final step is setting up the workflow to calculate the totals.
To set up the workflow:
Note: Capitalization and the exact wording you used in your workflow automation formula keys earlier are critical here. If you change any of the names / capitalization, you will need to reflect those changes in the formula.
This is what it should look like:
If you’re having trouble you can review:
Automating Account with Workflow Automation guide for full details
Save and Enable the Automation
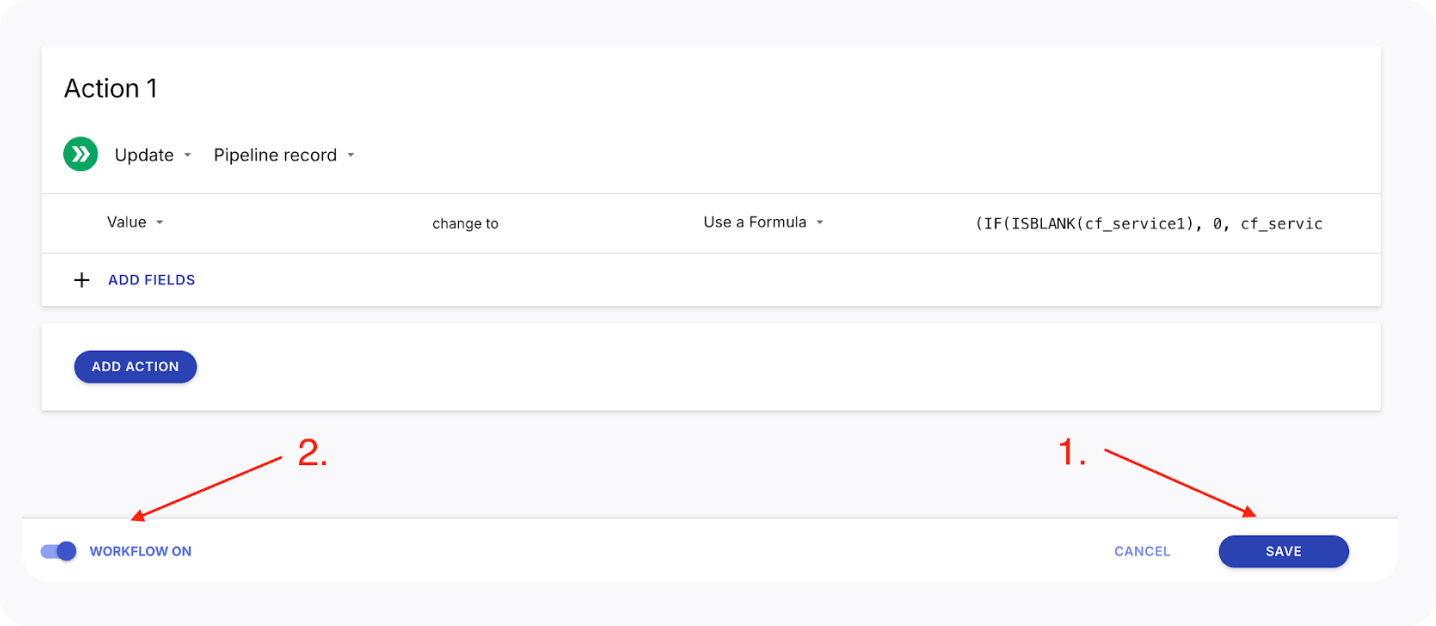
Test the Workflow Automation
To make sure all of this is visible in your pipeline, Go to Pipelines > “Configure” > “Edit card fields” to add the fields most important to you, like industry, Client Fit Score or tags.
We can also create lists of leads based on your ranges:
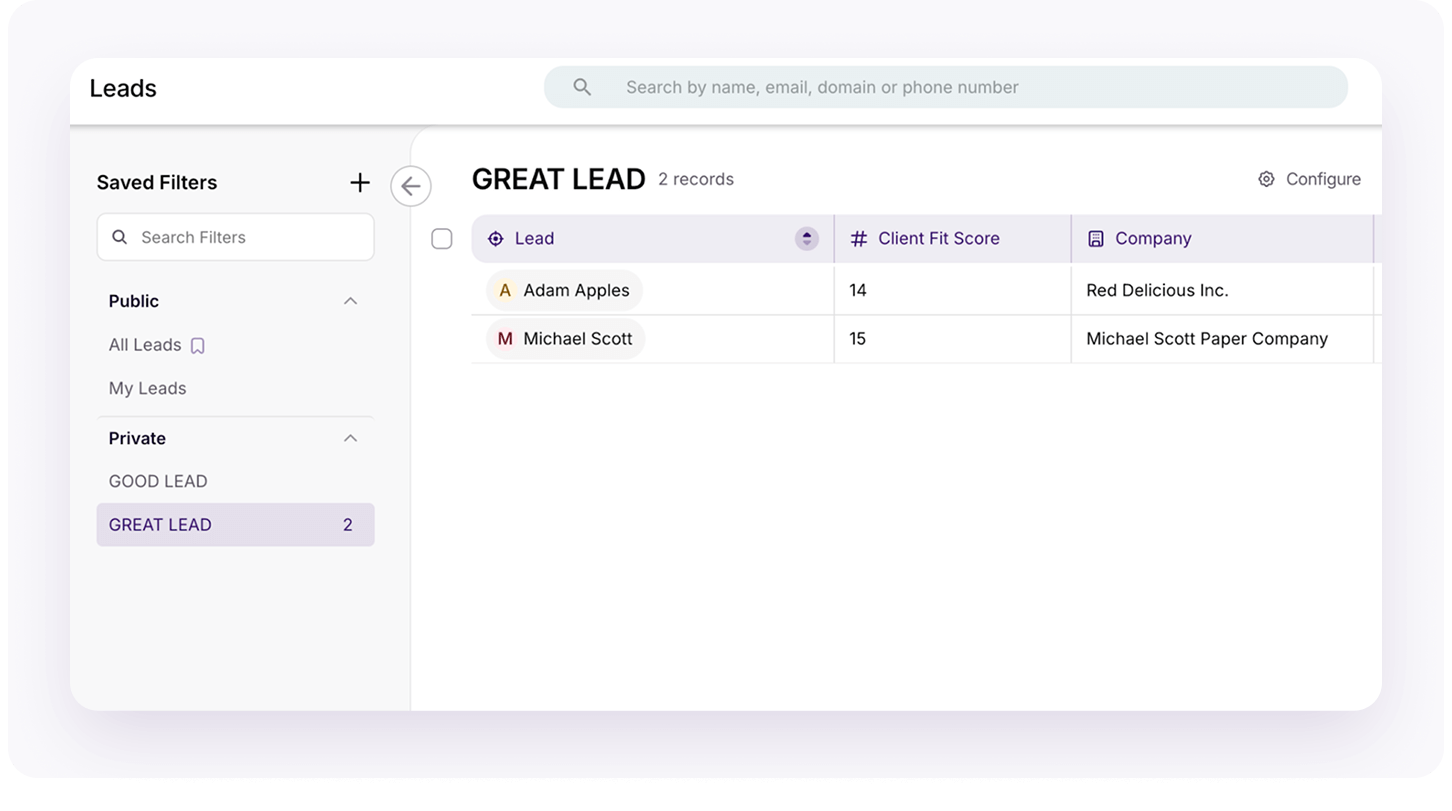
Now you know who to focus on and when!
Related: 6 Features to Look For in a CRM for Agencies
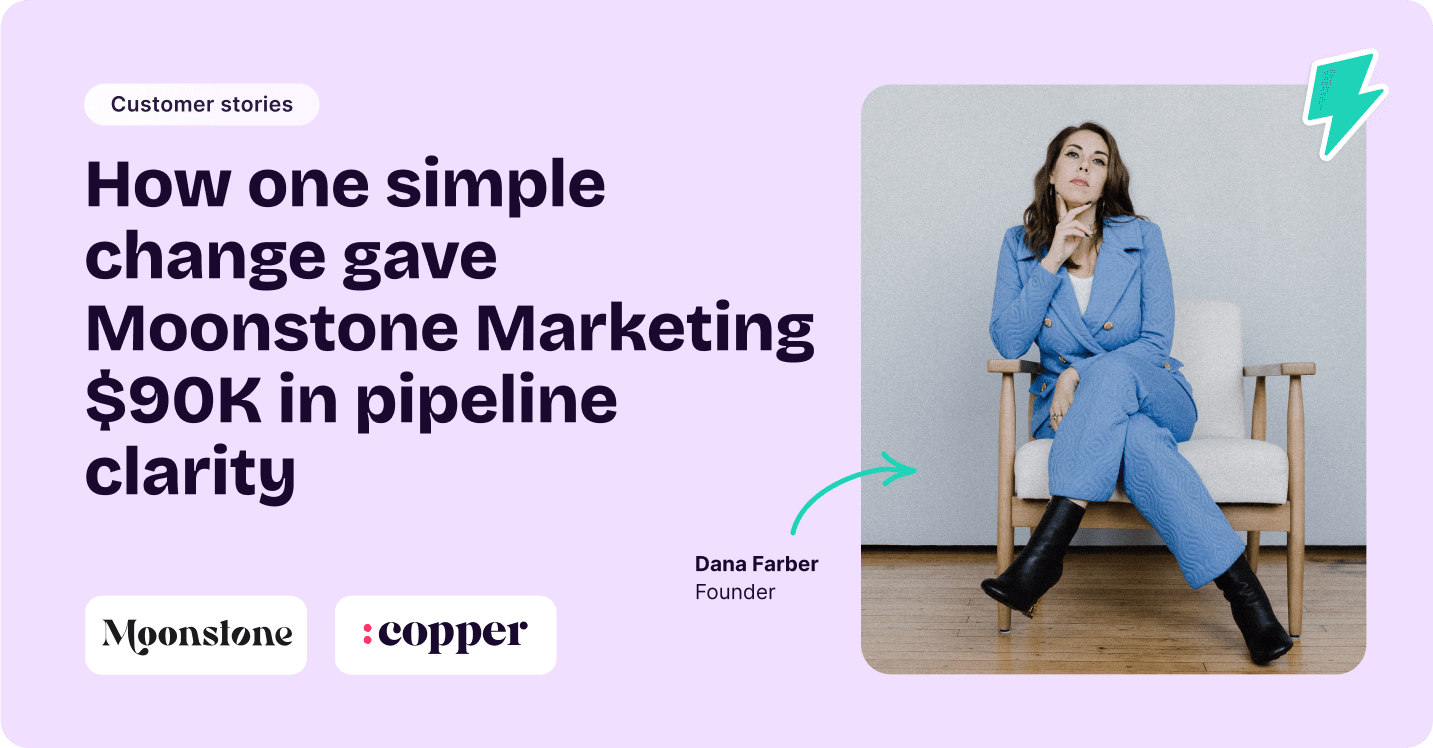
By switching from spreadsheets to Copper, Dana Farber didn’t just improve her workflow—she unlocked $90,000 in pipeline clarity and took her business to the next level. With a CRM built to support her agency’s growth, she now has a seamless way to track leads, automate follow-ups, and build her sales pipeline like never before.
Now, Moonstone Marketing is more organized, efficient, and ready for what’s next.
We’re so excited for you to try this out and see how it changes your approach to relationships-driven sales. Remember, lead generation doesn’t need to be painful or overwhelming. You just have to be consistent!
Because when your systems work with you, growth feels effortless. Try Copper for free today and see how it can transform your business, too.
Instant activation, no credit card required. Give Copper a try today.